Let's use this thread to collect some helpful information for all the people who want to calibrate their vintage effects (non-BOSS). For some units there are no service manuals or schematics around. And some don't have labelled components on the boards, making it quite difficult to find out what is what.
The two units I begin with have already been posted in other parts of the forum, but I'd like to gather everything in this topic.
Trimpot compendium (various brands)
-
Pepe
- Posts: 2276
- Joined: Thu Aug 16, 2018 2:19 pm
- Location: Germany
- SBZ: Multi Platinum
- Bossarea: Double Platinum
- Contact:
Re: Trimpot compendium (various brands)
KORG FK-1 V-C-F
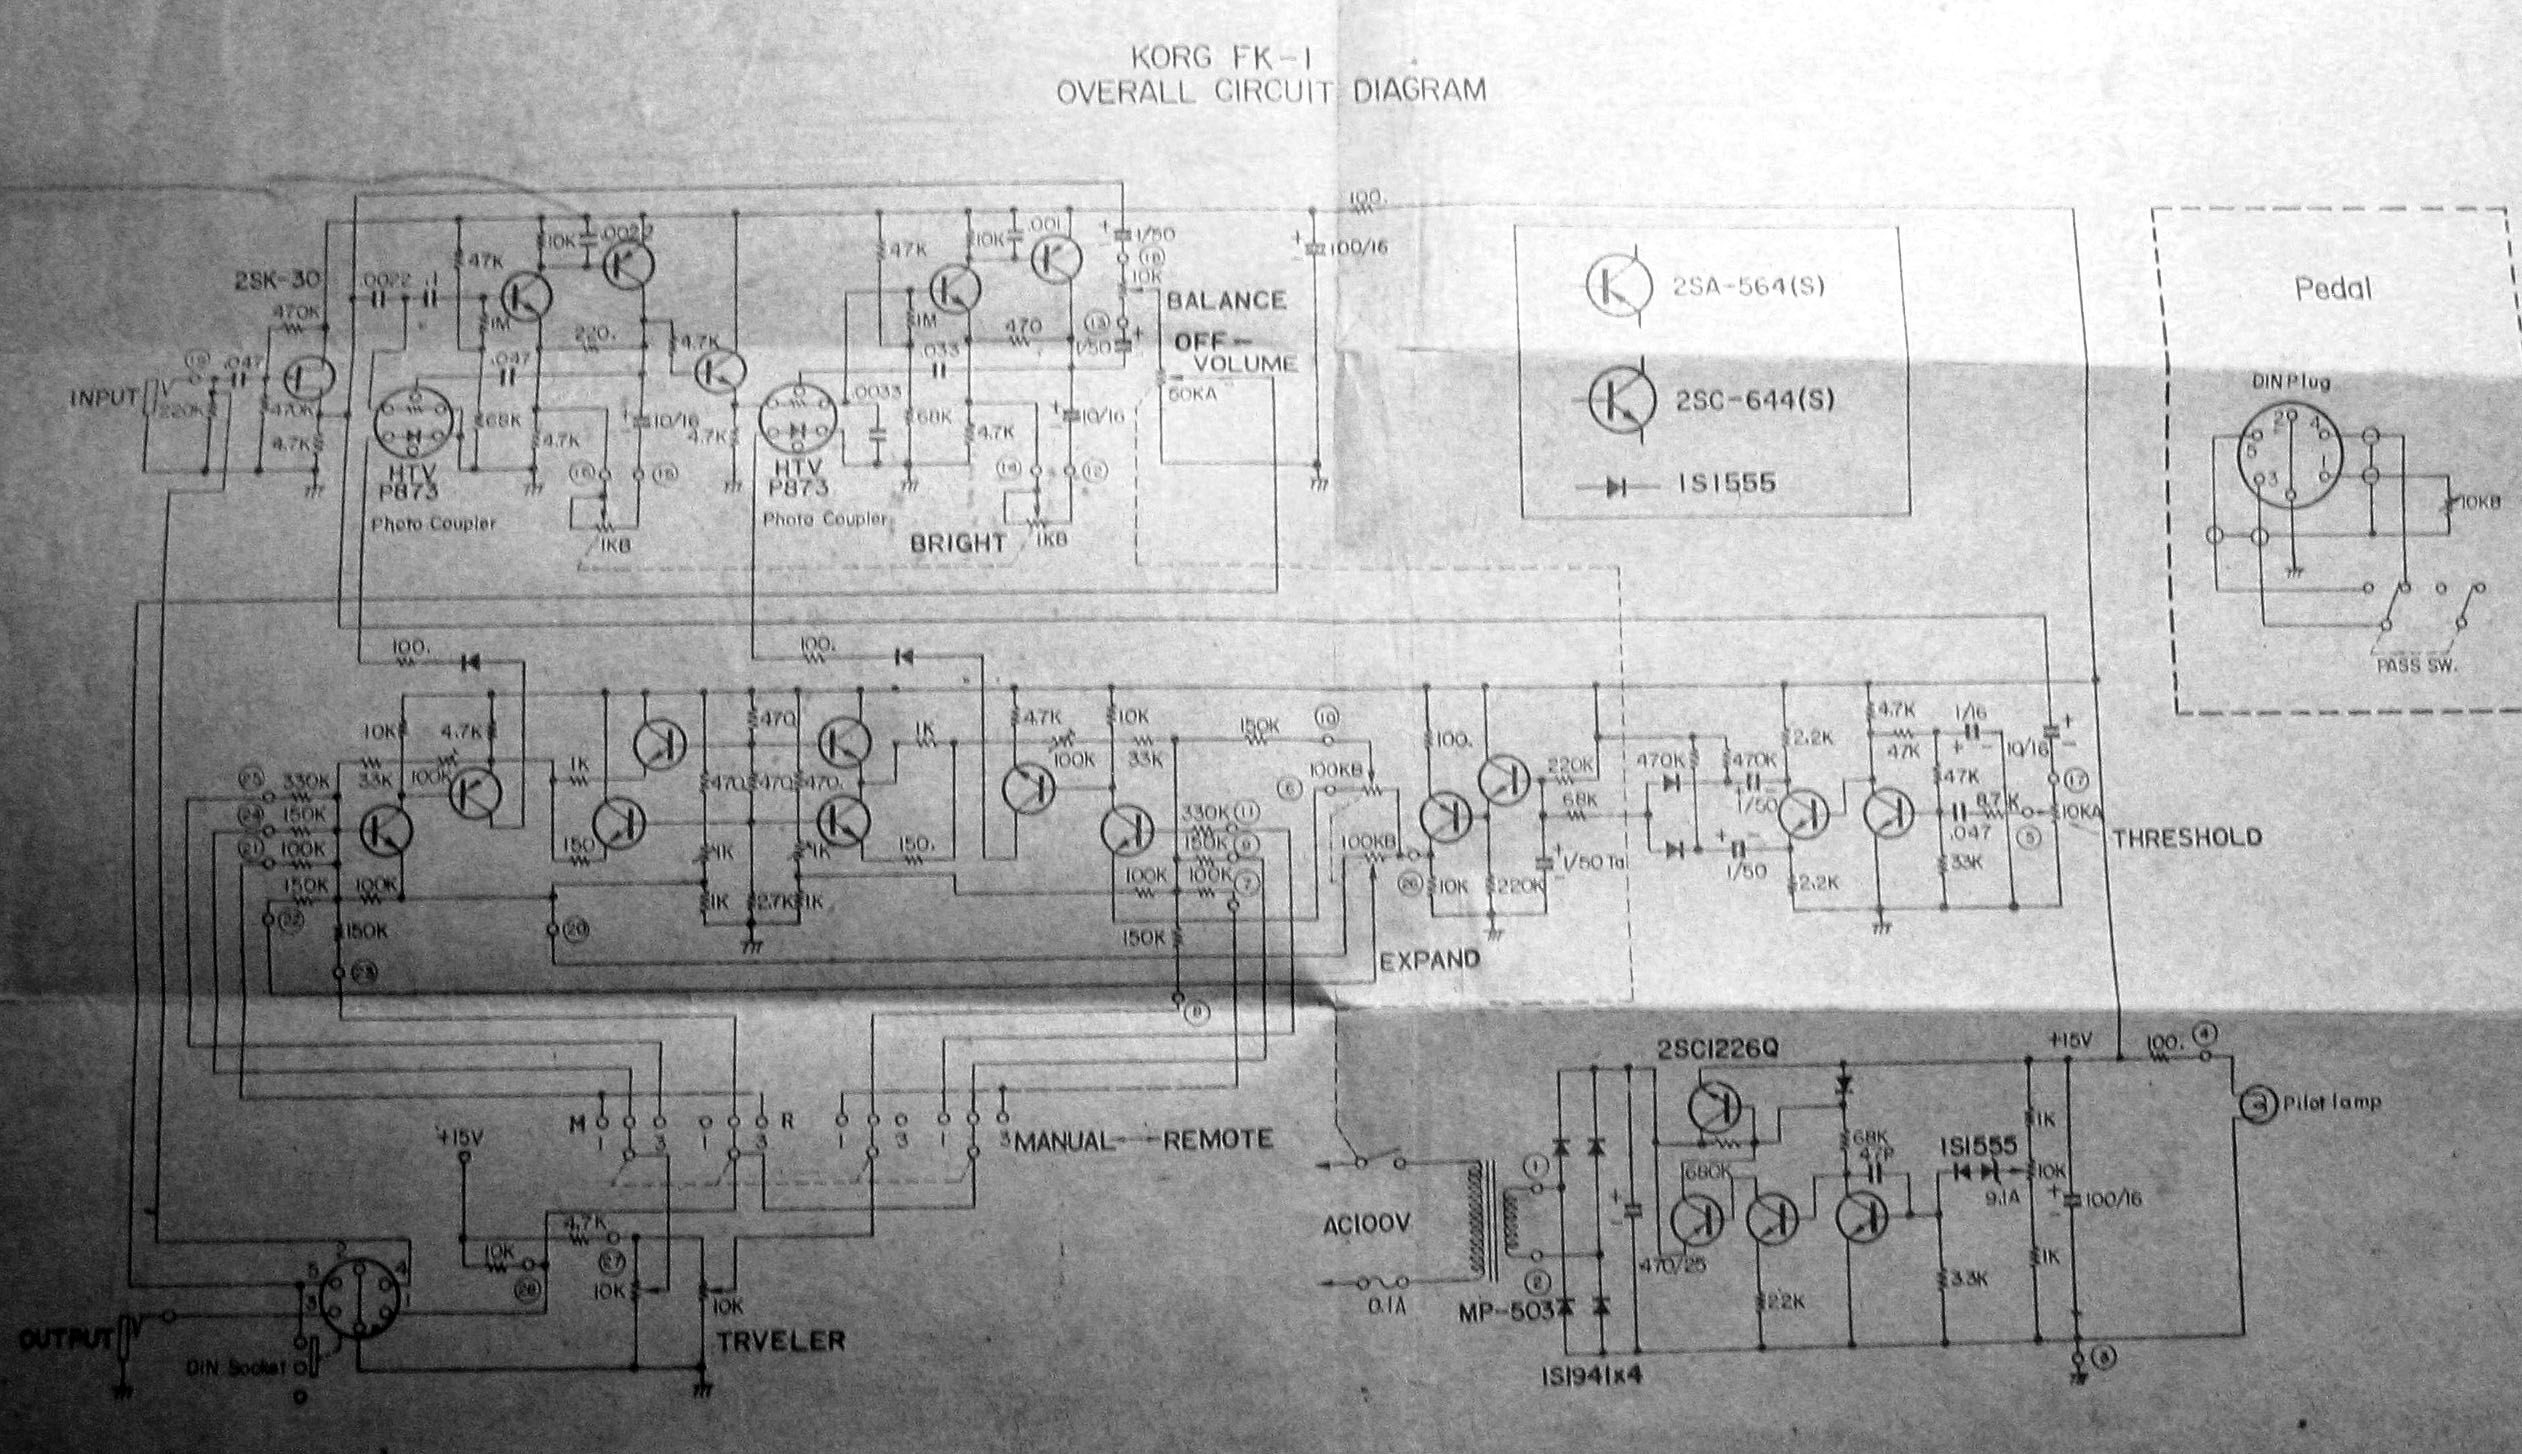
There is no service manual around, in the internet only this same lo-fi photograph of the schematics can be found, that I uploaded a copy of here:
KORG V-C-F schematics
The big 10kΩ trimpot adjusts the main voltage for the circuit and should be set to 15.0 V.
The two 1kΩ trimpots seem to adjust the intensity of the "Expand" function of the lowpass and highpass filter.
The 100kΩ trimpot that is sitting right next to the one 1kΩ trimpot sets the high-pass filter frequency, the other 100kΩ trimpot is for the low-pass filter.
-
Pepe
- Posts: 2276
- Joined: Thu Aug 16, 2018 2:19 pm
- Location: Germany
- SBZ: Multi Platinum
- Bossarea: Double Platinum
- Contact:
Re: Trimpot compendium (various brands)
Pearl AD-33 Analog Delay
AVR1: Feedback Channel I
AVR2: Feedback Channel II
AVR3: BBD Bias (not 100% sure)
AVR4: Clock Cancel (not 100% sure)
AVR5: Clock Frequency
AVR6: Filter


AVR1: Feedback Channel I
AVR2: Feedback Channel II
AVR3: BBD Bias (not 100% sure)
AVR4: Clock Cancel (not 100% sure)
AVR5: Clock Frequency
AVR6: Filter


-
Pepe
- Posts: 2276
- Joined: Thu Aug 16, 2018 2:19 pm
- Location: Germany
- SBZ: Multi Platinum
- Bossarea: Double Platinum
- Contact:
Re: Trimpot compendium (various brands)
Aria AD-10 Analog Delay
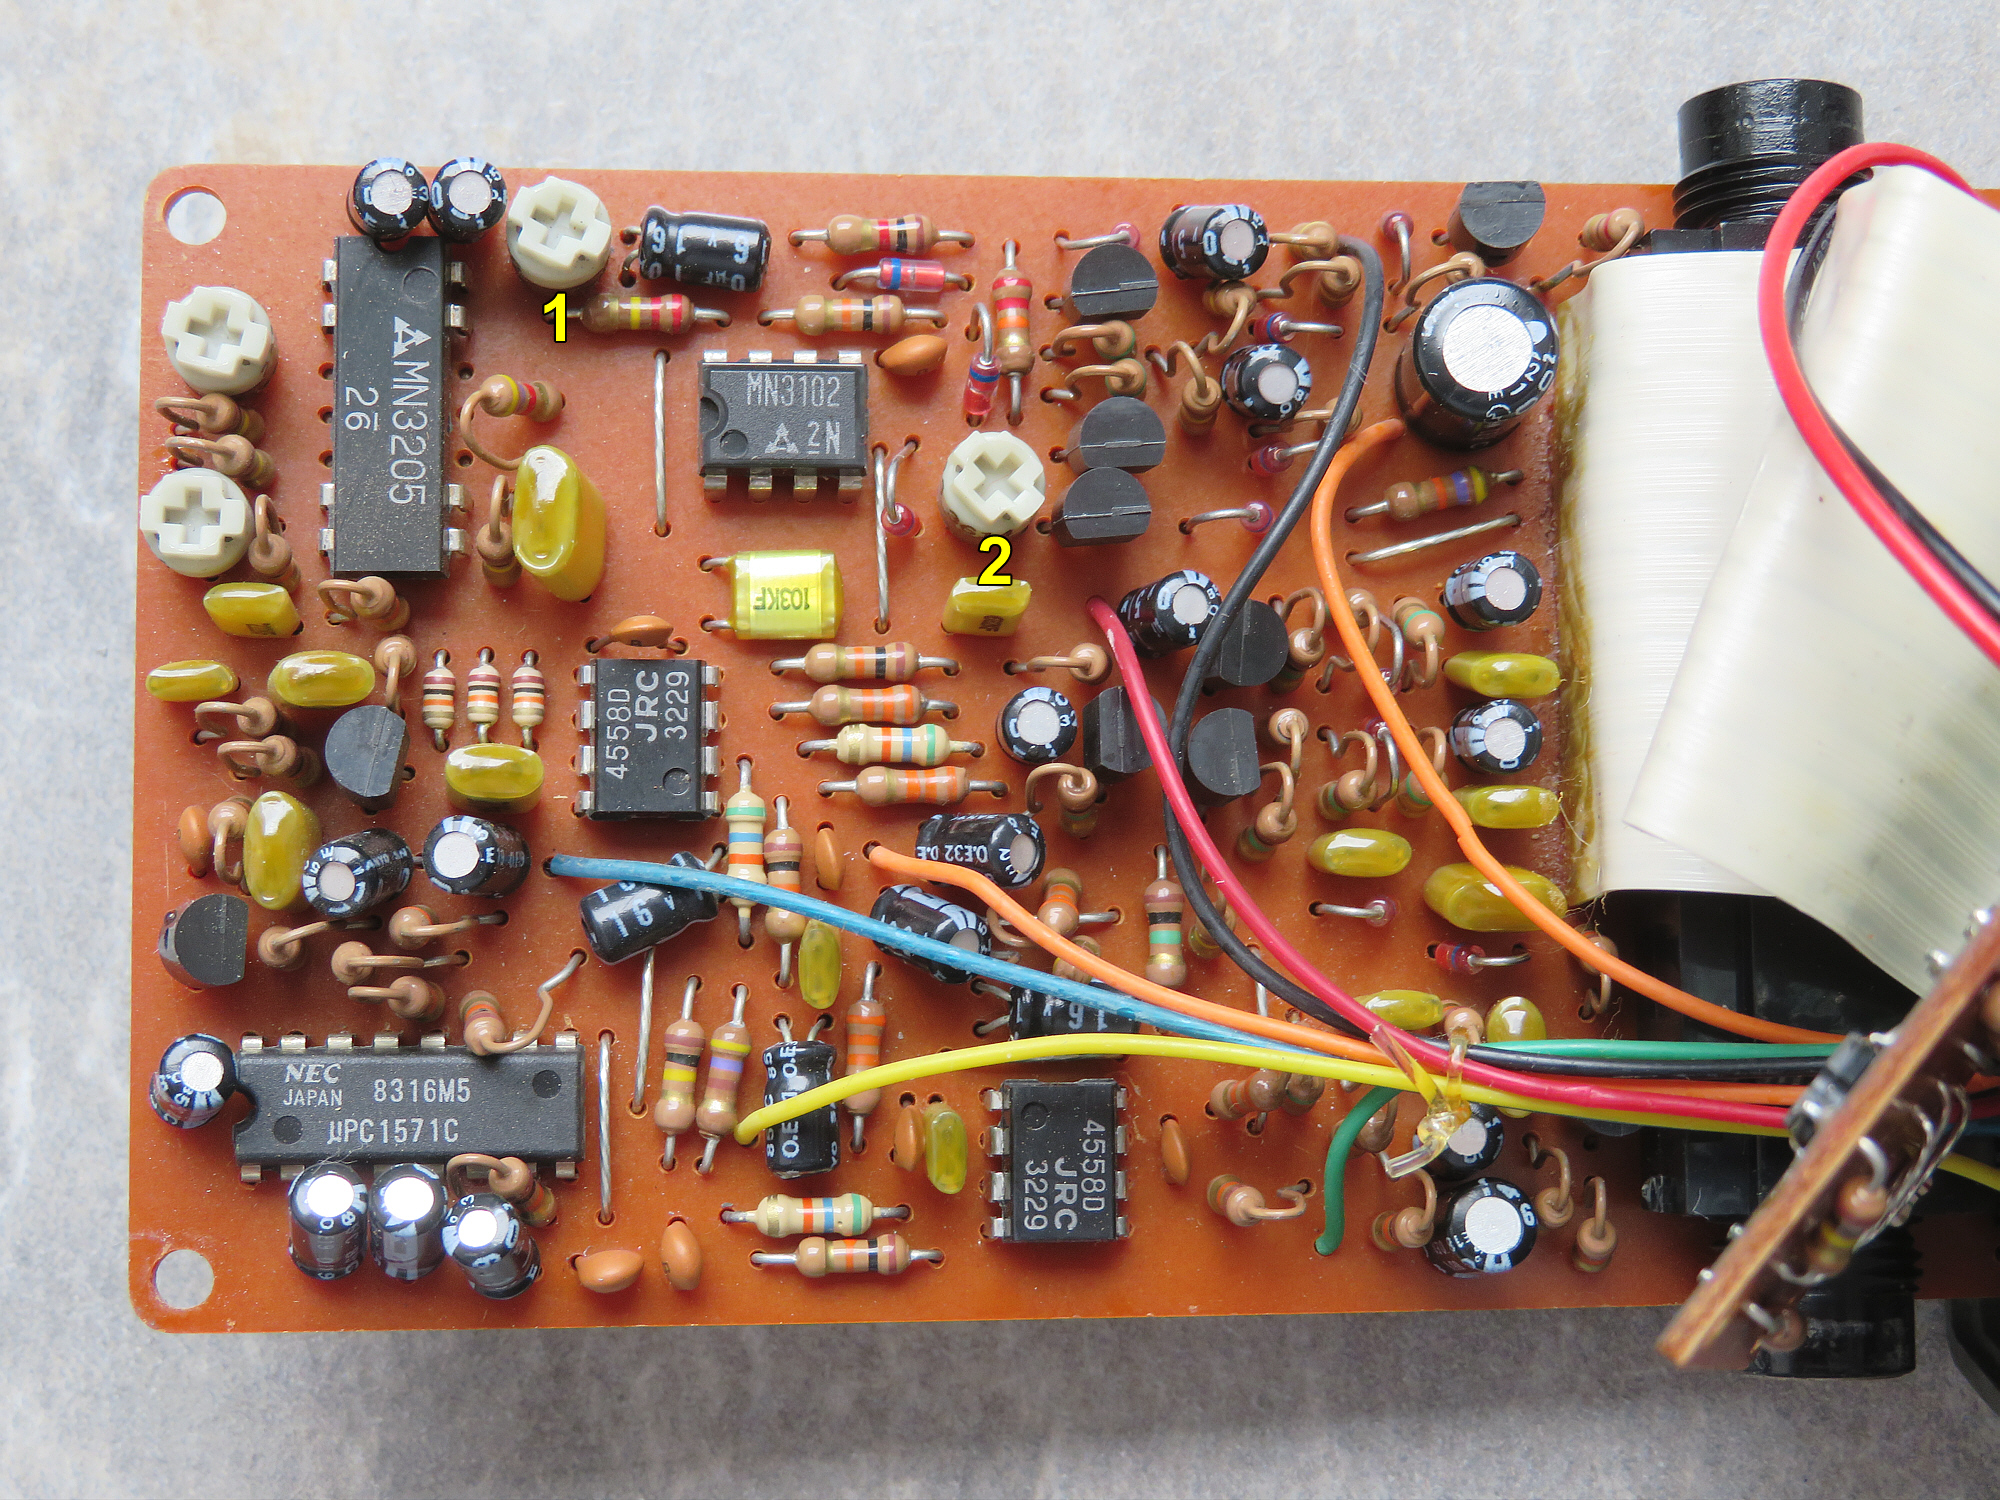
The trimpot labelled "1" in this picture adjusts the longest, "2" the shortest possible delay time.
The other two trimpots are supposedly for bias and feedback (I didn't touch them).
The trimpot labelled "1" in this picture adjusts the longest, "2" the shortest possible delay time.
The other two trimpots are supposedly for bias and feedback (I didn't touch them).
-
fuzzbuzzfuzz
- Posts: 614
- Joined: Thu Aug 23, 2018 11:25 am
-
Pepe
- Posts: 2276
- Joined: Thu Aug 16, 2018 2:19 pm
- Location: Germany
- SBZ: Multi Platinum
- Bossarea: Double Platinum
- Contact:
Re: Trimpot compendium (various brands)
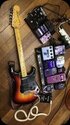
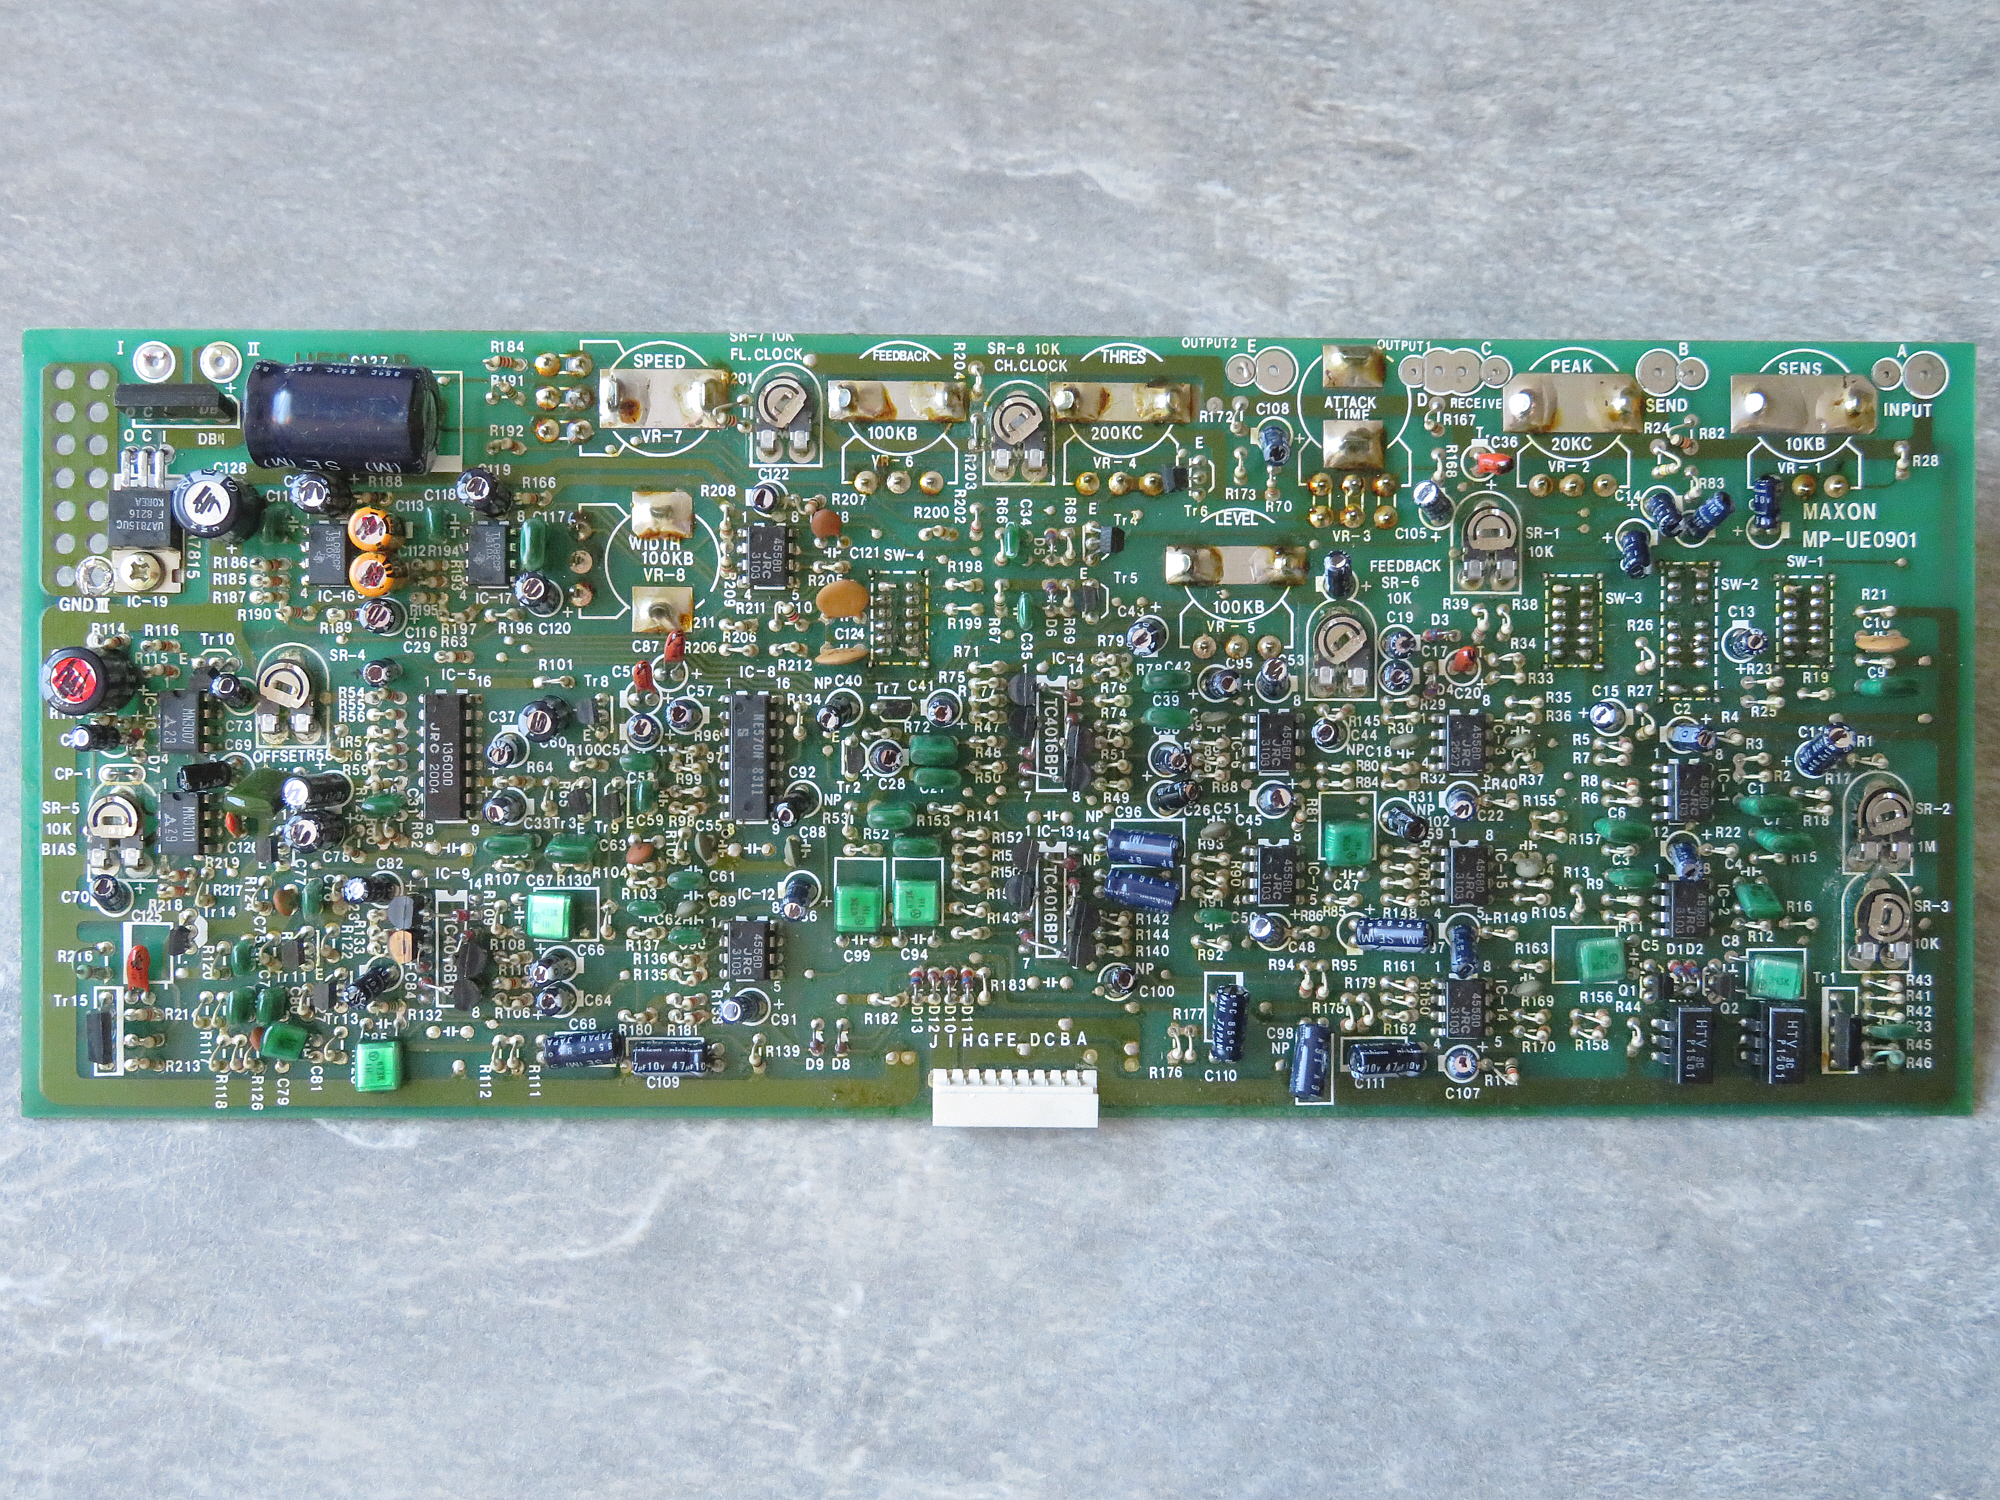
Ibanez UE 303 B Multi-Effects
A bassist from Belgium sent me this Ibanez UE 303 B after I recapped his KORG PME-40X pedal board. He asked me if I could do some maintenance here as well. His main problem was that the Auto Filter needed very hot signals to get working somehow. It was really awful when I received it, also the chorus effect sounded underwhelming.
I did a full recap, swapping all the old electrolytic capacitors for high quality Panasonic FC (and NHG) and Nichicon MUSE capacitors and I also replaced the old tantalum caps, of course. It was a very tough job, because the old solder wasn't flowing well and I had much trouble getting clean solder holes, although I used quality desoldering braid that does normally not let me down. Two solder eyelets came off, luckily they had no function on that side of the circuit board apart helping to keep the capacitor in place. I had to replace 72 capacitors! And none of them were easy to desolder. And the holes had to be super clean, because they barely provided enough space for the legs of the new capacitors. I was so glad when I was finally finished. I think I never want to touch another Ibanez UE pedal after these horrific days, not to mention to do another full recap!
But the result was phenomenal! All of a sudden the chorus did instantly sound so good with a bass guitar. The Auto Filter was still very weak, But after some time fiddling with the trimpots it came alive in a great way. I was able to shift the range of the envelope in UP mode into the higher frequencies in a manner that the overall sound was maintained, but completely expanded. Now it is really fun(ky) to use this auto wah in all modes. I am satisfied and I am certain that the Belgian will love it.
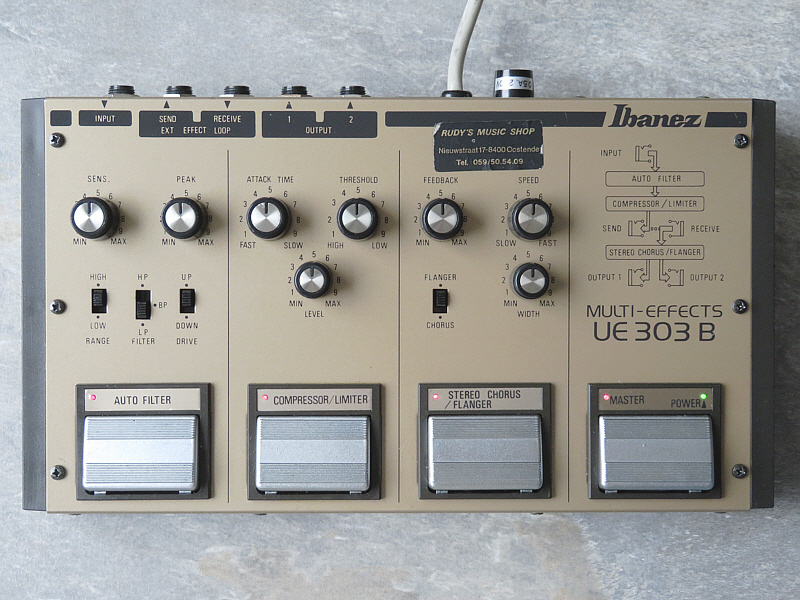

SR1: Auto Filter DOWN mode envelope filter frequency
SR2: Auto Filter UP mode envelope filter frequency
SR3: Auto Filter basic filter frequency
SR4: Chorus/Flanger Offset (Manual - there is no dedicated Manual knob on control panel)
SR5: Chorus/Flanger Bias
SR6: Flanger Feedback
SR7: Flanger Clock
SR8: Chorus Clock
[The trimpots SR1, 2 and 3 do interact with each other - it needs some time to find the sweet spot.]
Circuit board before the recap (click on the images for photos in higher resolution):
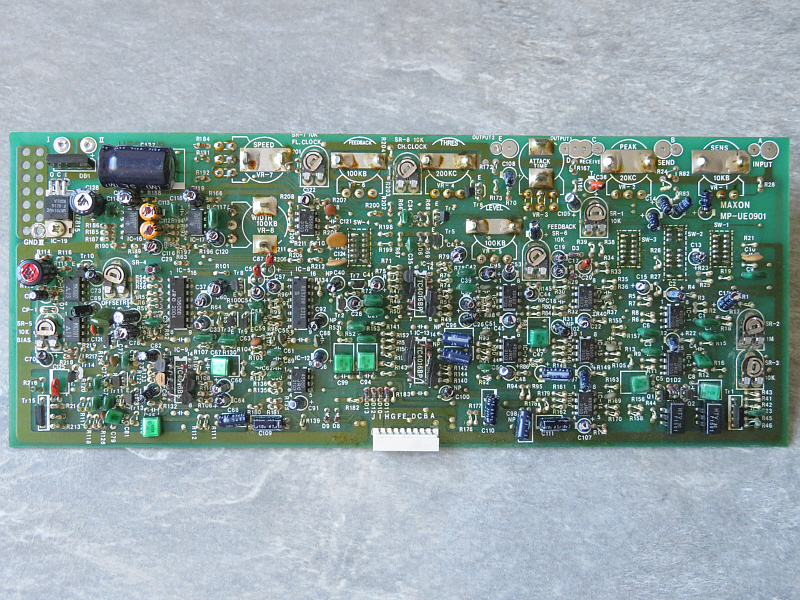
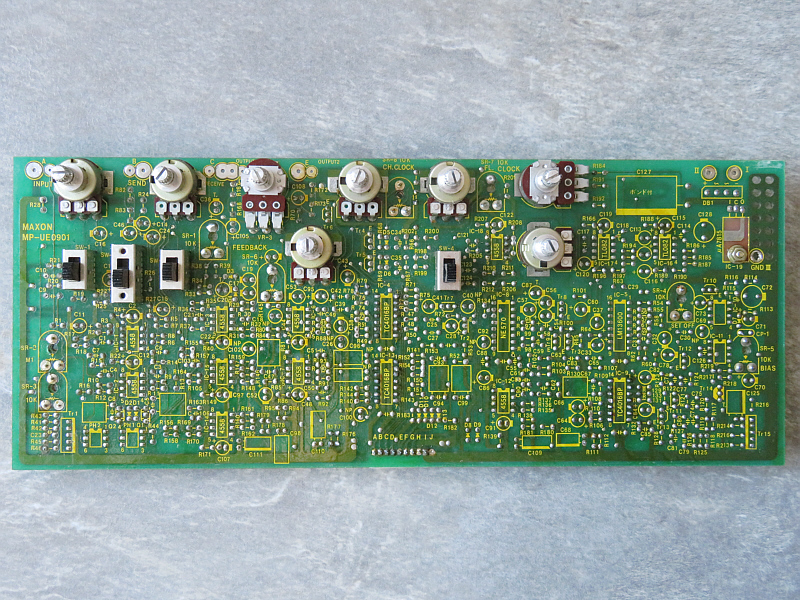
Sadly there is no service manual or schematic around, so here is a full list of the electrolytic and tantalum capacitors of the Ibanez UE 303 B:
A bassist from Belgium sent me this Ibanez UE 303 B after I recapped his KORG PME-40X pedal board. He asked me if I could do some maintenance here as well. His main problem was that the Auto Filter needed very hot signals to get working somehow. It was really awful when I received it, also the chorus effect sounded underwhelming.
I did a full recap, swapping all the old electrolytic capacitors for high quality Panasonic FC (and NHG) and Nichicon MUSE capacitors and I also replaced the old tantalum caps, of course. It was a very tough job, because the old solder wasn't flowing well and I had much trouble getting clean solder holes, although I used quality desoldering braid that does normally not let me down. Two solder eyelets came off, luckily they had no function on that side of the circuit board apart helping to keep the capacitor in place. I had to replace 72 capacitors! And none of them were easy to desolder. And the holes had to be super clean, because they barely provided enough space for the legs of the new capacitors. I was so glad when I was finally finished. I think I never want to touch another Ibanez UE pedal after these horrific days, not to mention to do another full recap!
But the result was phenomenal! All of a sudden the chorus did instantly sound so good with a bass guitar. The Auto Filter was still very weak, But after some time fiddling with the trimpots it came alive in a great way. I was able to shift the range of the envelope in UP mode into the higher frequencies in a manner that the overall sound was maintained, but completely expanded. Now it is really fun(ky) to use this auto wah in all modes. I am satisfied and I am certain that the Belgian will love it.
SR1: Auto Filter DOWN mode envelope filter frequency
SR2: Auto Filter UP mode envelope filter frequency
SR3: Auto Filter basic filter frequency
SR4: Chorus/Flanger Offset (Manual - there is no dedicated Manual knob on control panel)
SR5: Chorus/Flanger Bias
SR6: Flanger Feedback
SR7: Flanger Clock
SR8: Chorus Clock
[The trimpots SR1, 2 and 3 do interact with each other - it needs some time to find the sweet spot.]
Circuit board before the recap (click on the images for photos in higher resolution):

Sadly there is no service manual or schematic around, so here is a full list of the electrolytic and tantalum capacitors of the Ibanez UE 303 B:
Code: Select all
C33	0.22µF	50V
C95	0.22µF	50V
C26	1µF	50V	bipolar
C40	1µF	50V	bipolar
C44	1µF	50V	bipolar
C69	1µF	50V	bipolar
C92	1µF	50V	bipolar
C100	1µF	50V	bipolar
C102	1µF	50V	bipolar
C13	1µF	50V
C14	1µF	50V
C15	1µF	50V
C16	1µF	50V
C17	1µF	50V
C19	1µF	50V
C24	1µF	50V
C28	1µF	50V
C37	1µF	50V
C38	1µF	50V
C41	1µF	50V
C64	1µF	50V
C66	1µF	50V
C71	1µF	50V
C73	1µF	50V
C82	1µF	50V
C84	1µF	50V
C29	2.2µF	50V
?	2.2µF	50V	next to the Level potentiometer VR-5, above Feedback trimpot
C2	10µF	16V
C12	10µF	16V
C22	10µF	16V
C45	10µF	16V
C46	10µF	16V
C48	10µF	16V
C53	10µF	16V
C54	10µF	16V
C57	10µF	16V
C70	10µF	16V
C86	10µF	16V
C91	10µF	16V
C97	10µF	16V
C105	10µF	16V
C107	10µF	16V
C108	10µF	16V
C122	10µF	16V
C96	10µF	16V	bipolar
C98	10µF	16V	bipolar
?	10µF	16V	bipolar, below C96
C112	47µF	10V
C113	47µF	10V
C11	47µF	10V
C32	47µF	10V
C43	47µF	10V
C52	47µF	10V
C68	47µF	10V
C109	47µF	10V
C110	47µF	10V
C111	47µF	10V
C116	47µF	10V
C120	47µF	10V
C60	47µF	16V
C78	47µF	16V
C115	47µF	16V
C119	47µF	16V
C72	220µF	16V
C128	220µF	16V
C127	1000µF	35V
C20	0.68µF	35V	Tantalum
C36	10µF	16V	Tantalum
C56	0.47µF	35V	Tantalum
C87	0.47µF	35V	Tantalum
C125 10µF 16V Tantalum-
laurie
- Posts: 2246
- Joined: Fri Aug 17, 2018 2:07 am
- Location: Canada
- SBZ: Multi Platinum
- Bossarea: Multi Platinum
Re: Trimpot compendium (various brands)
Nice! Great work. Great result.
-
laurie
- Posts: 2246
- Joined: Fri Aug 17, 2018 2:07 am
- Location: Canada
- SBZ: Multi Platinum
- Bossarea: Multi Platinum
Re: Trimpot compendium (various brands)
This is probably also how you do it, but just in case this helps... For tight/difficult component swaps I usually cut the component from its legs then heat and pull one leg at a time. Add some new solder to the old solder just before pulling the leg. Clean the hole with braid.
I also use one of these, but they are pretty expensive:
https://www.amazon.ca/Hakko-FR-301-Deso ... 07BKSLLG9/
I also use one of these, but they are pretty expensive:
https://www.amazon.ca/Hakko-FR-301-Deso ... 07BKSLLG9/
-
Pepe
- Posts: 2276
- Joined: Thu Aug 16, 2018 2:19 pm
- Location: Germany
- SBZ: Multi Platinum
- Bossarea: Double Platinum
- Contact:
Re: Trimpot compendium (various brands)
In most cases Stannol No Clean desoldering braid is simply magic, so normally I don't need to do that. But for the next fiddly project I'm going to try the method with cutting the legs off. The trick with new solder didn't help too much. It might be because nowadays I only use lead-free Stannol HS10 Fair solder, but the holes were too tight for anything.
-
laurie
- Posts: 2246
- Joined: Fri Aug 17, 2018 2:07 am
- Location: Canada
- SBZ: Multi Platinum
- Bossarea: Multi Platinum
Re: Trimpot compendium (various brands)
Ah. Yes. Solder containing lead isn't available in Europe. Makes repairing old equipment a little more problematic.Pepe wrote: ↑Mon Dec 01, 2025 6:57 amIn most cases Stannol No Clean desoldering braid is simply magic, so normally I don't need to do that. But for the next fiddly project I'm going to try the method with cutting the legs off. The trick with new solder didn't help too much. It might be because nowadays I only use lead-free Stannol HS10 Fair solder, but the holes were too tight for anything.